Showing posts with label yarn craft. Show all posts

Friday, September 20, 2013

Nothing But Variegated


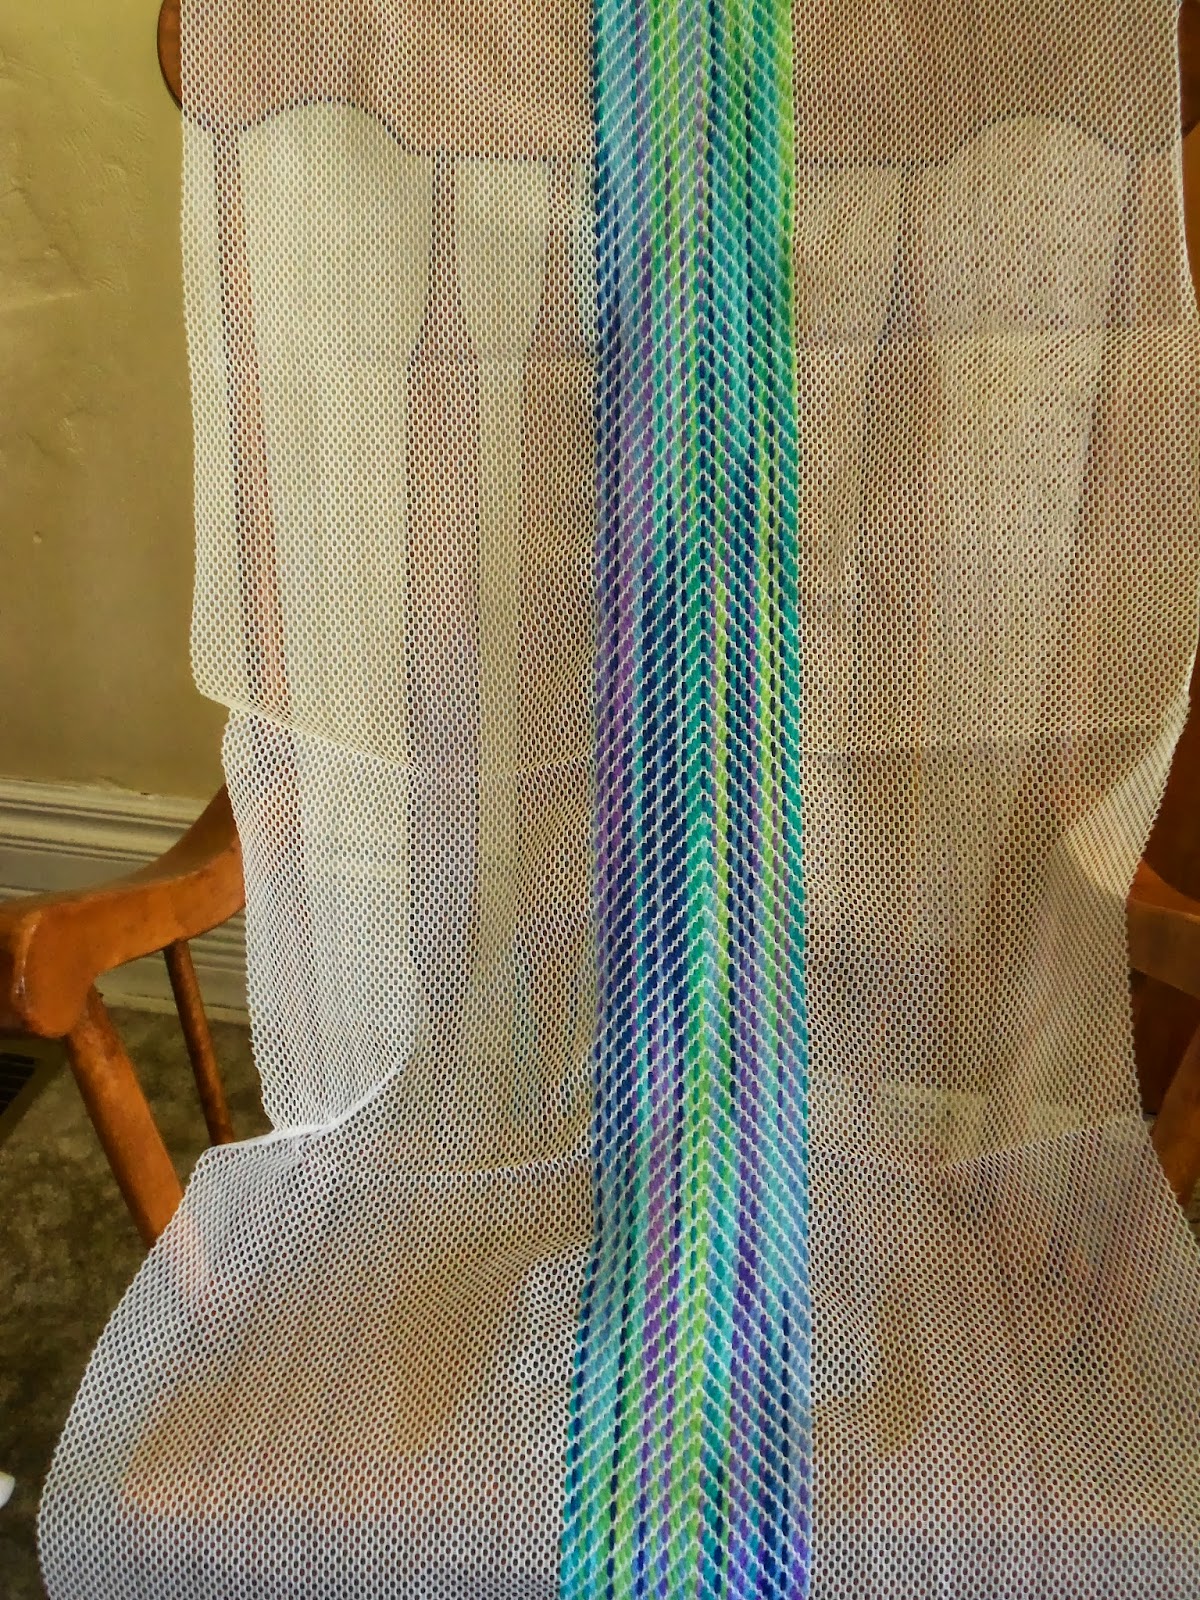
Here's where I am in a prayer shawl using nothing but variegated yarn. The visible mesh is going to be one big chevron - ascending on the left side and descending on the right side.

I'll post it again when I get to the end of this project.

Thanks for visiting with me.

Kathi Linz

Wednesday, September 18, 2013

Woven Granny Squares Complete

 
Finished!  And it doesn't look as washed out in person as it does in this photo.


I was hoping to use up some of my odd bits of yarn, but I hardly touched my stash for this project. The good thing about mesh weaving is that it takes a good deal less yarn than other types of yarn crafts. Or maybe it's the bad thing since I have S.A.B.L.E. - Stash Above and Beyond Life Expectancy.
 
I want to do a prayer shawl completely in variegated yarn to show you how that comes out. I also have a certain color of yarn coming in the mail so I can work up a baby blanket for a friend's great-granddaughter soon to be arriving.
 
But I also have something challenging to figure out. I was looking at bargello yesterday. I like the pomegranate pattern.


However, I don't know how it would translate to mesh weaving.  Look at the canvas you would ordinarily use to do a bargello pattern. The lines cross each other forming perfect squares.


Mesh has rows where the holes are offset.


My best guess for reconstructing bargello on utility mesh would be that you'd need to use a shorter yarn needle and work through the middle of some of the "slubs" - the woven stuff between the holes.

If I were to use a bargello-type pattern on utility mesh, I think I would do a couple of rows of the bargello pattern as an accent row separated by plain weaving.

I'll think about it while I first do the other projects I mentioned.  Hmmm...

Thanks for visiting with me,

Kathi Linz
 

Wednesday, September 11, 2013

Patterns Side-to-Side


Weaving side-to-side on the mesh.

These two ways to weave make a stacked brick pattern:

Blue - Go down in first hole of each row.
Red - Go down in the first hole of the first row.
          Go up in the first hole of the next row. Alternate.
It makes no difference in the pattern which one you choose for this pattern.


Close up of stacked bricks - start of rows


Diagonal weaving
Go down in the first hole of each row. Turn the corner at any point you choose, but make sure that the following rows turn the corner at the same point.

My next post will show some weaving patterns using the up-and-down rows.

Thanks for visiting with me,

Kathi Linz


Sunday, September 8, 2013

Half Plaid

I finished fixing and weaving the plaid base. I used a traditional overhand knot for the fringe and trimmed it fairly short - at least my idea of short. If perhaps a hospice care person is in a wheel chair, I would want the fringe short enough not to easily get in the wheels.


I wove this lap robe from side to side across the mesh. For every row, I started by going down into the first hole.
 
 
If  you look at the dark rows of the pattern, you will see that the visible mesh makes a small zigzag - almost a straight line across the weave. It's possible to make chevrons going either up and down the mesh or across. In the next couple of days, I'll make some small samples to give you exact directions for ways to show off the visible mesh.
 
Thanks for visiting with me,
 
Kathi Linz


Friday, September 6, 2013

Gift Quality?

Some people believe that when they start a book, they have to finish reading it. Some people think the same thing about any project they start.

I want to give this plaid lap robe to hospice. Tell me if you think this is good enough to offer to someone who is suffering.


To me, it looks sloppy. Obviously, there is something about the process of weaving plaid that I have not yet mastered. I will eventually try again with a simpler pattern.

I want to make my time and your time worth while. If I can cut out the up and down part of the pattern, I will fill in the across weaving with white and offer that to hospice.
Even that will be a challenge.

What I wanted to show you at the end of this project is how to weave in the ends of the yarn on the sides where you don't want fringe. I guess that will be happening at another time.

I apologize for this glitch. But if you can see that I'm not perfect and that I don't have this whole thing securely under my belt, you will feel more ready to jump in too, knowing that we can grow into this together.

If I can remove the 44 up and down rows that I've put in, I'll show you the final project. If I wreck the whole thing trying to save part of the work - well, we'll be starting on something new over the weekend.

Thanks for visiting with me,

Kathi Linz

Tuesday, September 3, 2013

Plaid Patterns

Put "plaid" into your favorite search engine and choose "Images".  Pick a pattern you like and favorite it or print it out in color.


That's our next project.

We can make any plaid we choose (I'm not sure about the diagonal ones - yet) with mesh weaving.

I'll show you how starting tomorrow. Today I have to work.

Thanks for visiting with me,

Kathi Linz

Thursday, August 29, 2013

Flipping the Afghan

Sometime back, I said that when the finished work became too cumbersome on the side nearest to me, I would turn the work. That puts the empty mesh over my lap. The table supports the heavier finished part of the afghan.

I've arrived at the halfway point and it was more than time to turn the afghan around.

 
I finished the knots on what used to be the beginning of the rows, so now the first half of the blanket is knotted at both ends.


When I flipped the chevron pattern baby blanket, I had no problem continuing with the pattern. Since the visible mesh didn't matter as part of the pattern, I could always start weaving going down into the first hole.
 
(Just to remind you how it looked)


But since I now have to consider the pattern of the mesh, I've discovered that it was easier for me to hit the first hole when I worked above the finished part. My mind has to work harder to figure out the pattern working below the previous rows. I can't tell you why that is. I'm simply reporting my observation.

Thanks for visiting with me,

Kathi Linz

Monday, August 26, 2013

Making Progress 2


I'd planned to be on the fourth stripes by tonight, but I foolishly went and bought groceries after work instead.

Tomorrow is another day. I should be nearing the middle before I sleep tomorrow.

Thanks for visiting with me,

Kathi Linz

Any Questions?

Any craft has its basic rules in order for it to look the way you want it to work. If you know the rules well, you can figure out how to correct or cover the mistakes you will inevitably make.

I'm an expert at making crochet mistakes disappear in the grand scheme of things and am learning quickly how to correct for mesh weaving errors. Nothing about this craft is really difficult. It takes some planning and paying attention to the pattern.

If you have any questions that I haven't addressed or, if you have information that I haven't stumbled upon yet, please add comments.  I would love to hear from others doing this particular yarn art.

I'll try to post my progress tonight.

Thanks for visiting with me,

Kathi Linz

Saturday, August 24, 2013

Making Progress

I don't want to put you all on hold, but I do want to finish this project before I go on to the next one.


I finally decided to put in 9 stripes. There will be four on each side and one up the middle.

I have a really exciting project in mind for the next thing I will do. I want to make a sampler loosely based on a crocheted granny square pattern.

Stay tuned. I'll keep you as informed as I can.

Thanks for visiting with me,

Kathi Linz
 

Extra Mesh

If I'm weaving a whole afghan, it gets a bit cumbersome to work with the extra mesh in the beginning and the finished woven section at the end.

It helps to make a few folds and pin them together or run a loop of yarn every so often along the length of the cloth like this.


Thanks for visiting with me,

Kathi Linz
 

Friday, August 23, 2013

A Couple of Thoughts on Weaving with Yarn

Sometimes when you pull the yarn through a number of holes in the mesh, the yarn will wind around itself and make a knot.

 
Hopefully, you understand that the proper way to deal with this is to stop pulling and work the knot loose.
 
 
The other thing that might help you as you weave is to know that sometimes - at least when I weave - the yarn untwists.  If this happens to you, figure out which way to twist the needle and give it a couple of turns to tighten up the yarn.  In my case, I have to turn it clockwise.
 
Thanks for visiting with me.
 
Kathi Linz


Wednesday, August 21, 2013

Starting a Blank Canvas

I've shown you how to trim and baste the hems. 

How do you plan a blank canvas if you have an idea, but don't know the exact size of each portion yet?

Here's how I do it.

This time, I'm working the length of the canvas rather than side-to-side.  However, I learned from the baby blanket that it's much easier to work across the table instead of reaching forward to work UP the length of the blanket. So I've incorporated that into the way I'm going to weave this afghan.

I'm starting on the outside edge. I will work far enough into the pattern to like the way it looks. Then I will flip the mesh and work the other side in the same pattern. 

As I get a little farther into this piece, I will show you what I mean.

Thanks for visiting with me,

Kathi Linz

Erasing a Mistake

I tried to weave a six-pointed star. Emphasis on "tried".

First, I laid out two perpendicular lines so I could keep track of the pattern I saw in my mind.

I started with purple to make the first point of the star. It was to be a quilt-like pattern with six diamonds meeting in the middle and forming the points on the outer edges.

I finished the purple section and went on to the peach colored section. Between the two diamonds, I had already covered half of the area.

It simply didn't come out the way I'd planned.

So how do you undo, redo, fix something that goes wrong?

If you've done something in a long straight line that doesn't turn out the way you'd like it to, just grab the end and pull. You can use the yarn again.


If you've woven back and forth with one length of yarn - and if you are very patient - you can unweave it by pulling up a loop near the end of your work and working it loose.

I chose not to do it that way. I pulled up a loop at the turn of my weaving and cut the yarn in several places. If you do this, be careful that your scissors don't catch in the mesh.


Then you pull the cut ends to take out the yarn.


The mesh is not harmed and you can start over or make the corrections as necessary.
 
By the way, I am not going to give up on this pattern.  I've just decided not to start here. I think a little more practice and a couple more test runs will get the job done.
 
Thanks for visiting with me,
 
Kathi Linz
 

Monday, August 19, 2013

Thickness of Yarn

Working with the baby yarn spoiled me. It made the weaving easy.

When I tried to use regular worsted weight yarn (4 weight), it was just a l-i-t-t-l-e bit too thick to easily fit through the mesh. So I was fighting with the pucker again. Weaving with worsted weight yarn is do-able, but not as easy.

I know there are some "worsted weight" yarns that are a bit thinner than average. Variegated yarn often is just a tad thinner. Also I am going to experiment with a 3 weight to see how that works.

I don't want to give up the bolder colors just to make the weaving easier. Baby yarn weaves well, but often comes in pale colors.

I'll just have to see what works best.

Thanks for visiting with me,

Kathi Linz
 

Sunday, August 18, 2013

Finished Baby Blanket


Here's the finished work. It only took a week - and I had to figure it out almost from scratch.

I have photos of the last couple of steps.

After I worked on the blanket for a while and had one end finished, I found that it was easier and cooler to turn the blanket and work from the middle out to the other end.

 After I finished, I was thrilled beyond description that I had knotted the edges as I went along at the end of each strand. You can't easily knot the beginning of each row, but it's only one more stitch to knot the ends.

After I finished the rest of the knots, I had to trim the fringe.


I hung the edge of the blanket over the side of the card table, straightened out the fringe, and trimmed it to a nice length on all four sides.

I think it came out okay, considering that I worked out most of the techniques by myself. Setting it up was the hardest part. Once I made the important decisions, it was as simple as anything I've ever made.

Give it a try. You might enjoy yourself and come up with a nice piece of yarn craft at the same time.

Thanks for visiting with me,

Kathi Linz


Friday, August 16, 2013

Cutting Yarn

Your raw materials for mesh weaving are utility mesh and skeins of yarn.

I showed you how to prepare the mesh, but I haven't said anything about how to cut the yarn so that it comes out right.  SEEMS straightforward, right? Well...maybe.

The first property of yarn is that it stretches. In this craft, that matters quite a bit in two ways. First, it matters when you cut it, and, secondly, it matters when you weave it.

When I made my first two afghans, I measured the length of the mesh and added a few inches in my head for the fringe. Then I found something approximately the right length (turned the card table over and wrapped the yarn around three of the legs in a triangle pattern). I cut all of the yarn at once and draped the lengths over a coat hanger. I had a handy peg or something near my work station so I could just reach over and grab another strand when I started each row.

So far, that makes perfect sense, right? Well, it did to me at the time. Perhaps time and practice have made me a little more cautious. Here's what actually happened when I did it that way. The kit contained a certain amount of yarn and no yarn on the market matched it. If I put even an inch or two extra on each strand, I came out short on the number of lengths I needed to finish the afghan. You'll see that I went over by more than a couple of inches. Creativity helped me overcome that, but it didn't end up the way I had planned.


Another thing about cutting the strands all at once, is that if you measure too short, you can't fix it. Better to cut it too long than too short and make sure you have enough yarn to cover the area.

When I had all of the strands on a coat hanger and pulled one strand loose, the whole bunch was inclined to slide along with the one I pulled. Some ends tangled with each other. If I wrapped the yarns across my shoulders, I could pull a strand loose with less draggage (is that a word?), but still the whole pile would shift.

Here's what I am doing differently this time.

1. I cut one piece and made sure it was an appropriate length.
2. Once I knew the correct length, I cut a few strands at a time.
3. I measure the strands on a yard stick that I keep close to my table.
4. I measure the yarn loosely. If I stretch it during the measurement, it may not be long enough to fit the row I am working on.

Please feel free to find a method that works for you, but please learn from my mistakes. Think about the stretch of the yarn when you cut the strands you will weave.

Thanks for visiting with me,

Kathi Linz


Thursday, August 15, 2013

Fringe Options

Most of the time, you won't have to think about the fringe until your project is finished.
When I worked on this ripple pattern, I had some strands of yarn that are very short and only woven through a few holes in the mesh. I didn't want them to come loose while I finished the rest of the piece, so I thought about how I wanted the fringe to look right away.

Here's what the unfinished edge looks like.


I tried the traditional type of fringe which is to take a given number of strands and tie a knot near the edge of the fabric.


This blanket is for a baby. If I put a bunch of knots on the edge, both the mother and the baby are going to have those clumps pressed between them, leaving dents in their skin.  Not what I have in mind for a nice present.

I pondered the possibilities. If I just trimmed all the strands to an even length, it would look nice and LIKELY would stay together. But as I said, some of the strands at the lower edge are only attached to a few spaces in the mesh. One good tug and those would come out.  Also not what I have in mind for a nice present.

So I wondered what would happen if I made a small locking knot on each strand.


I threaded a short yarn needle and poked it back through the same space that it was last woven through. I didn't pull it tight. That forms a loop.
 

Then I pulled the needle through the loop and snugged it down to the mesh edge.


My concern was whether or not the knots would be large enough to cause rippling along the edge. After I completed knotting all of the strands, I was pretty happy with the way it came out. The edge looks smooth and doesn't have any uncomfortable clumps.

Thanks for visiting with me,

Kathi


Wednesday, August 14, 2013

Preventing Bunches

When you weave through the mesh, you have to be extremely aware of the tension of the final pull of the yarn through the holes.

If you don't pull the yarn tight enough, there will be bunches in the yarn that will make the finished product feel rough and will snag easily.

If you pull too tightly, the mesh will pull into the center and you will have a wasp-waisted product. The edges will probably have a ripple as the center tightens.

The best way to work the yarn is to pull it smoothly tight. Then run your hand up the row to smooth the mesh upwards along the length of the yarn.

Thanks for visiting with me,

Kathi

Getting a Good Start - Part 2

Once you make sure your starting row is going in the exact direction you want it to go, there are still a couple more things you should watch for before merrily heading toward the finish line.

I wove 6 rows across in the ripple pattern I wanted to make. This is a side-to-side pattern, giving me the option of making fringe on all four sides or weaving in the ends on two edges.

At first, I was planning to make fringe only on the top and bottom of the blanket and weave in each strand on the sides. As I worked the first six rows, I left short ends to make the finishing of the edge easier.

Then after I saw how the blanket was beginning to take shape, I decided to leave fringe on each side. That meant I had to reweave those six rows to leave a longer tail on each side.

 
On my first weave, I skipped every other hole. When the six rows were done, I analyzed the look of the project. Fringe was only one consideration. I want this to look good all the way through as I intend it to be a baby gift. Skipping holes left too much of the mesh showing. So I rewove those rows, going through every hole.
 
That looked a lot better, but I was using baby yarn and the final effect looked too thin.
I did an experimental row using a double strand of baby yarn. (Worsted weight yarn is the best weight for this medium.)

 
After just one row, you can see that it looks fuller and more substantial. The color shows up better as well.
 
All in all, I believe I rewove those six rows five or six times until I was completely satisfied with the way it was looking.
 
 
Once I liked it, I started to fill it in.


At this point, the project becomes easy - almost mindless - depending on the complexity of your pattern.  The decisions have been made. The corrections improve the appearance. And on you go to a sweet finish.

Thanks for visiting with me,

Kathi