Showing posts with label basic mesh weaving patterns. Show all posts

Friday, June 15, 2018

Knotted and Done

The lap robe I've been working on is finished. I tied the edge knots and trimmed the long ends this morning.

Maybe you will be better at tying knots than I am. Please forgive the unevenness.

I do know that double knotting the ends makes a wild and crazy fringe. The ends stick out all over. They need to be tied with an overhand knot two or three at a time. You can tie more ends at once if you wish, keeping in mind that the clusters will be farther apart and you might bunch up the edge if you pull the knots too close.

The one thing to think of is that the knots need to include at least one over and one under strand so the knots stay at the edge where they belong.

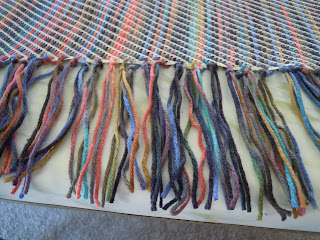

I'm getting more fabric tomorrow. Big project to work on by the middle of July.

Thanks for visiting with me.

Kathi

Wednesday, September 11, 2013

Patterns for the Length of the Mesh

Here are some of the basic patterns for weaving the length of the mesh.


These four are made by choosing to weaving up or down in the first hole of the row and then weaving up and down in each hole of the row going up.

I will be writing these patterns working from right to left.


The red downward diagonal (working from right to left) is made like this:
 
Work down in the first hole of the first row.
Work up in the first hole of the second row.
Work up in the first hole of the third row.
Work down in the first hole of the fourth row.
Work down in the first hole of the fifth row.
 
Repeat 2 ups and 2 downs to form the pattern.
 
The green chevron (working from right to left) is made like this:
 

Work down in the first hole of the first row.
Work down in the first hole of the second row.
Work up in the first hole of the third row.
Work up in the first hole of the fourth row.
Work up in the first hole of the fifth row.
Work down in the first hole of the sixth row.
Work down in the first hole of the seventh row.
Work down in the first hole of the eighth row.
Work up in the first hole of the ninth row.
Work up in the first hole of the tenth row.
Work up in the first hole of the eleventh row.
Work down in the first hole of the twelfth row.
 
Alternate 3 ups and 3 downs to form the pattern.


The red upward diagonal  (working from right to left) is made like this:
 

Work down in the first hole of the first row.
Work down in the first hole of the second row.
Work up in the first hole of the third row.
Work up in the first hole of the fourth row.
Work down in the first hole of the fifth row.
Work down in the first hole of the sixth row.
 
Repeat 2 downs and 2 ups to form this pattern.
 
The blue zig-zag (working from either direction) is made like this:
 
Go down in the first hole of every row.
 
These are the basics. There are a few special patterns that we can play with, but most of the old patterns and probably the ones you are likely to use the most will have one or a combination of these basics.
 
Thanks for visiting with me.
 
Kathi Linz